本格的にPostgreSQLに慣れるための環境を作りたい!ということで、Windows11PC上で構築したいと思いました。
以前は「Vagrant」で環境構築を行っていたのですが、こういった環境づくりも久々でして。。。
WSLも進化しているようでした!
(1) WSLのセットアップ
①BIOS側でCPUの仮想化機能を有効化
- 仮想化ソフトウェアを使用し、1台のパソコンで複数のOSやアプリケーションを同時に実行できるようにするために、BIOS設定で、仮想化テクノロジー(Virtualization Technology)を有効化します。
②Windows機能の有効化


③Linuxカーネル更新プログラムパッケージをダウンロード
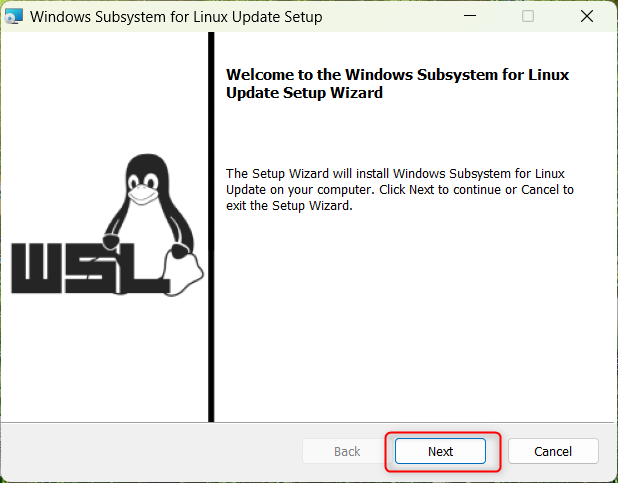
私の場合、上記サイトより、「x64 マシン用 WSL2 Linux カーネル更新プログラム パッケージ」を取得しました。
「wsl_update_x64.msi」というインストーラーを入手し、インストールを行います。


④WSL2をデフォルトに設定
PoweShellを「管理者モード」で起動します。
> wsl --set-default-version 2
(2) AlmaLinux9 WSL(ディストリビューション)アプリの追加
次に、Microsoft Storeより、ディストリビューションアプリ「AlmaLinux9」を入手します。

(3) AlmaLinux9 WSLの基本構築
①ユーザー作成(初回起動時)
アプリをインストールしましたら、アプリを起動します。
すると、初回時にはユーザー作成を求められました。
Installing, this may take a few minutes...
Please create a default UNIX user account. The username does not need to match your Windows username.
For more information visit: https://aka.ms/wslusers
Enter new UNIX username: t_yamada
Changing password for user t_yamada.
New password: ********************
Retype new password: ********************
passwd: all authentication tokens updated successfully.
Installation successful!
②ipアドレス確認方法
- IPアドレスは、OS起動のたびに変更されるので注意が必要です。
$ ip a

6: eth0: <BROADCAST,MULTICAST,UP,LOWER_UP> mtu 1500 qdisc mq state UP group default qlen 1000
    link/ether 00:15:5d:95:a1:34 brd ff:ff:ff:ff:ff:ff
    inet 172.20.218.103/20 brd 172.20.223.255 scope global eth0  <<<<< 動的に変化するIPアドレス
       valid_lft forever preferred_lft forever
    inet6 fe80::215:5dff:fe95:a134/64 scope link
       valid_lft forever preferred_lft forever
③一括アップデート
$ cat /etc/redhat-release
AlmaLinux release 9.5 (Teal Serval)

$ sudo su -
[sudo] password for t_yamada: ****************

# dnf update -y
④日付確認
- JSTになっているかを確認しましょう!
$ date
Wed May 14 07:05:49 PM JST 2025
⑤ロケール関連のパッケージをインストール
- postgreSQLのデータベースを作成する際に「ja_JP.utf8」にするため、事前にロケールを追加していきます。
# dnf install -y glibc-locale-source glibc-langpack-ja

//確認
# locale -a | grep ja_JP
ja_JP.eucjp
ja_JP.utf8
(4) PostgreSQLの構築
- 現時点では、Ver17が最新のようでした。
①PostgreSQL公式リポジトリのRPMをインストール
# dnf install -y https://download.postgresql.org/pub/repos/yum/reporpms/EL-9-x86_64/pgdg-redhat-repo-latest.noarch.rpm
②AlmaLinuxのAppStreamにある古いPostgreSQLを無効化
# dnf -qy module disable postgresql
③PostgreSQL17をインストール
# dnf install -y postgresql17-server postgresql17
④Postgresコマンドのパスを通す(root, postgresユーザ)
root
# echo 'export PATH=/usr/pgsql-17/bin:$PATH' >> ~/.bash_profile
# source ~/.bash_profile
postgres
# su - postgres
$ echo 'export PATH=/usr/pgsql-17/bin:$PATH' >> ~/.bash_profile
$ source ~/.bash_profile
⑤postgers Version確認
# postgres --version
postgres (PostgreSQL) 17.5
⑥データディレクトリの初期化(クラスタ領域の作成)
# postgresql-17-setup initdb

Initializing database ... OK
⑦PostgreSQL起動・確認・終了
$ pg_ctl -D /var/lib/pgsql/17/data -l logfile start
waiting for server to start.... done
server started

$ pg_ctl -D /var/lib/pgsql/17/data stop
waiting for server to shut down.... done
server stopped
⑧postgresリモート接続を可能にする
下記の2つのファイルを編集した後、PostgreSQLを再起動すると反映されます。
postgresql.confを編集
# vim /var/lib/pgsql/17/data/postgresql.conf
:
listen_addresses = '*'
pg_hba.confを編集
# vim /var/lib/pgsql/17/data/pg_hba.conf
:
# IPv4 local connections:
host    all             all             127.0.0.1/32          trust
host    all             all             172.0.0.0/8           trust
⑨接続確認(pgadmin4を使う)

⑩データベース作成(psql)
# su - postgres
$ psql
psql (17.5)
Type "help" for help.

postgres=# CREATE DATABASE sample_db
    WITH
    OWNER = postgres
    ENCODING = 'UTF8'
    LC_COLLATE = 'ja_JP.UTF-8'
    LC_CTYPE = 'ja_JP.UTF-8'
    LOCALE_PROVIDER = 'libc'
    CONNECTION LIMIT = -1
    TEMPLATE = template0;
CREATE DATABASE
(5) 仮想IPのポートフォワーディング設定
- PowerShell(管理者)を起動して行います。
> netsh interface portproxy delete v4tov4 listenport=5432 listenaddress=127.0.0.1  //前回の設定を削除する
> $wslIP = wsl hostname -I   //現在のIPアドレスを変数へ格納
> netsh interface portproxy add v4tov4 listenport=5432 listenaddress=127.0.0.1 connectport=5432 connectaddress=$wslIP  //トンネル設定

まとめ
ちょっと、ざっくりした手順になってしまいましたが、やりたいことは、WSLを起動し、手動でいいのでPostgreSQLを立ち上げ、自分のWindowsPCのPgadminⅣから PostgreSQLにアクセスできるようにしたかったのです。
もっといい方法もあるかと思いますが、まずはこれで検証できているので、OKでしょう!
探求の旅は、まだまだ続きます!